Part i. building the oven + patience
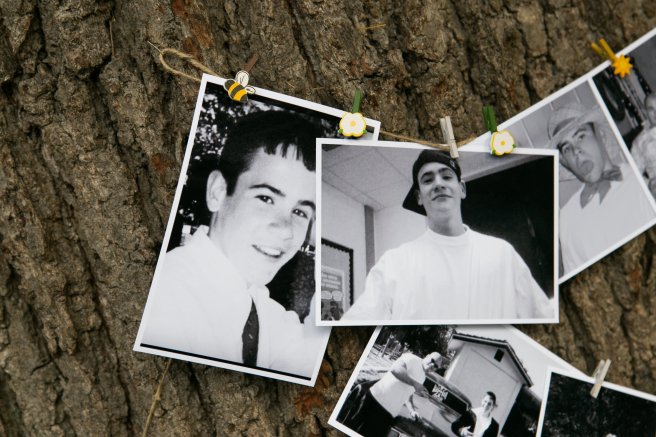
Mark Fearon’s 10 year anniversary was quickly approaching this fall and I knew I wanted to do something to acknowledge him and his mark he left on me. I thought about it for a while until it suddenly came to me, a pizza party/fundraiser. Mark and I went to school together since kindergarten and for as long as I can remember we loved pizza. We would ride our bikes all over Middletown to different pizza places. Then once we got older we started making our own pizza. We would ditch school while our parents were at work just so we could make pizza.
Then we went to culinary school together and we started making so much more than pizza. I thought what better way to celebrate him, than a pizza party, who doesn’t love pizza?
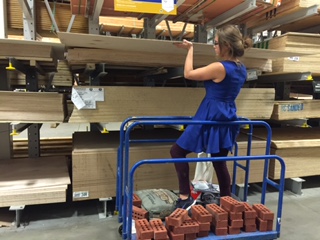
I use to plan outdoor pizza events and we would rent these copper trailers and make pizza. So I thought great, I will rent one of those, order some pizza shells from my cousin’s pizza manufacturing company and call it a day. Then I started researching the trailers and realized they ranged from $4-5k for the day + you had to use their labor. I wanted to have our culinary classmates and current culinary students partake in the cooking and I didn’t want to spend that much money.
It was Labor Day weekend and I thought ya know I will just make a DIY outdoor pizza oven. I have three days off, I can do this. I thought I could do anything- not the case. I can’t even lift a bag of cement. I can’t even do proper mathematical dimensions for a project like this. I can’t even calculate the amount of bricks per square foot. I can’t use a saw. I don’t even have the proper vehicle to get these supplies. But it is ok I can do it. I researched a little before that weekend, put a facebook post out there asking for help and the project began… Sept. 4th
That weekend I had the lovely help of my step- brother, sister in-law, step father and friend. Once I started talking with these experienced folks I realized I was in over my head. But I had already had a pallet of cinderblocks delivered so I couldn’t back out now.
1st step- measuring
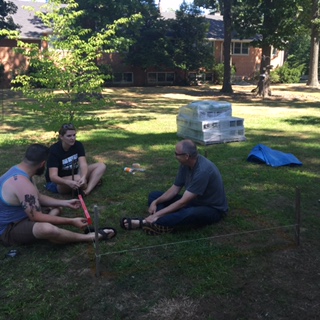
2nd step- digging
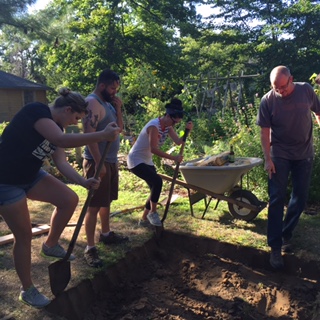
3rd step- tampering
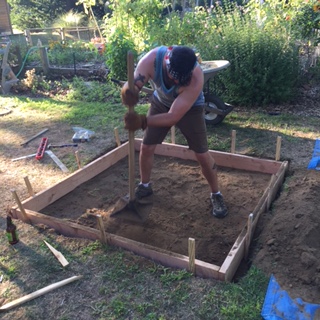
4th step- building a form (one of many)
5th step- leveling the ground…
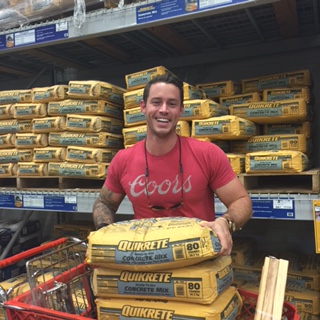
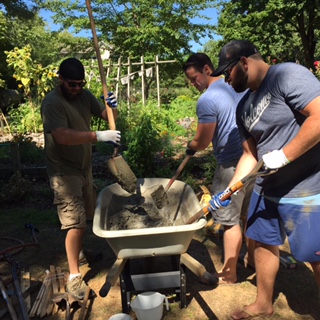
6th step- mixing cement. I miscalculated here and didn’t realize that we would need 18- 80 lb. bags of cement/mortar mix just for the base. So here is visit 2 out of at least 89 trips to Lowes. Thankfully I have strong wonderful friends who helped with lifting and delivering materials + several deliveries from Lowes, Rysers, Clayton, etc.
Who knew mixing cement was one of the hardest things? Buying a mixing from in the begin would have been brilliant. Right at about this step I should have realized that but no, we stuck with wheelbarrows and shovels for the duration of the project.
Ok, so here is when I realized the oven wouldn’t be done in 3 days. We needed to let the cement dry for days before we could continue. Oh boy was I disappointed. As an event planner, I started canceling all future plans and events for the next month. We had one month to finish this project. The fundraiser was supposed to be on October 4th.
In retrospect, the next building weekend was pretty easy. We laid the cinderblocks. My dad came up from North Carolina and helped. I did learn about splitting bricks; you can’t just lay bricks on each other, they have to be staggered aka I needed to figure out how to cut bricks. Lowes will not do this for you… So my handy friend figured out how to split them with a hammer and a mason chisel. This day I learned about spacers too. If you don’t know about bricks and forms I hope after reading this you have gained appreciation for all construction. If you look at bricks laid anywhere you will realize they are perfectly spaced with the same amount of cement, mortar, clay, grout, etc. throughout. This is because of these wonderful helpful little things called spacers!
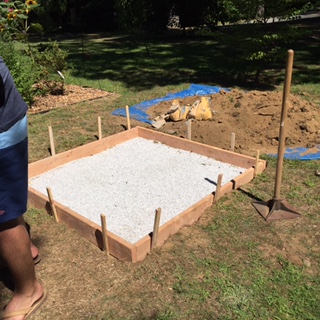
7th step- We had a foundation + a base!

But how were we going to get a top? This is where my dad was brilliant. We went to the mason yard at Rysers where I quickly developed a love for their brick selection and staff. I bought blue stone treds. I loved this part. Super easy. No mixing. No thinking. Just a good old caulking gun and some muscles to lift the treds on top of the base.
8th step- Ta da! We have a table top.
Ught oh, now how do we make the part that all of the delicious food will go on? The cooking service. It has to be smooth and withstand heat. I did this part and only this part by myself. As you can see, I didn’t do a good job. Eventually with the help of facetiming from across the country, my designated general contractor, Rob Stenger, told me to put the tools down. We figured it out. We needed to stager the fire bricks on a diagonal.
Right so I didn’t mention that fire bricks and fire clay are critical for this project. Fire bricks are expensive and hard to find. Fire clay is even harder because it is a recipe of: quick active lime, sand, clay, Portland cement (3:1 ratio) and water. Moisture is key when mixing.
9th step- cooking surface. To get fire bricks on a diagonal I now had to buy my favorite power tool, a saw with a sweet mason blade. Game on- power tool time.
10th step- the oven form… the step that caused my most anxiety. The reason for majority of my sleepless nights. The reason I had nightmares of counting bricks and having to hire help.
We thought so hard about this part. I googled, called, read and consulted with every person I knew and didn’t know. I was calling my roomate’s dad’s friends. I was calling Ryser’s everyday. At this point I had made friend’s with the guys at Lowes. I would ask everyone, how were we going to make the form? We thought of: cutting a garbage can, bought a cement cardboard form, use an exercise ball and then popping it, a pile of sand, a metal form, wood, etc. the list goes on. Finally some smart friends banged out a wooden form in an hour. They did the measurements, we went to the lumber yard, sawed some wood and we had another form! A beautiful perfect form, thanks to Ross Mackay and Kevin Keelen.
11th step- how do we get rectangle bricks to go around a round form? Ehhhhhh I just wanted a square oven at this point. Note- outdoor ovens are round for a reason. Everything is for a reason. The opening is a certain size. The chimneys are always in front. Etc. Everything is for a reason so the oven can best produce and withstand heat. It has to be round, with a certain size opening, with a beautiful chimney in the front.
Ok so fire bricks around the wooden form…
Cut the bricks, mix the clay, use spacers (not little ones- you have to make your own), cover the form, cut bricks, get help.
Also, since I don’t know how to calculate properly so many days we had to stop because we ran out of materials. As previously mentioned, supplies like fire clay and fire bricks are not something you can go run out and grab on a Saturday. They have to be pre ordered. This would set us back time and time again. I never had enough of what I needed. Cinderblocks on the other hand… pallets of.
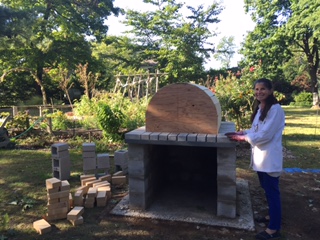
The form was finally covered in fire bricks!
12th step- chimney form
I was so happy to see an “oven”. But don’t get too excited. We essentially had to build an entire other oven on top of the fire bricks. An outdoor oven is two layers… Fire brick and then red bricks. The red bricks help hold all the heat in. Also, a fire brick is like a pizza stone you use at home. Great, so now we needed to build another layer.
Not only did we run out of supplies but we ran out of time… We had to push the event back. At this point I was putting every waking thought, dollar and minute into the project. It was going to be for a bigger cause. I reached out to Mark’s culinary school got students on board to come cook, old classmates on board, set up a scholarship fund. Ya know, go big or go home.
The oven got so big, physically way bigger than I had planned. Like I said I thought this was a cool weekend DIY project. Maybe some wood pallets with an oven on top. It was huge. The table top is over 4 ft. high. The actual oven is probably about 6ft. high (don’t hold me to it I still don’t know measurements) The oven is about 3.5 ft. deep.
Throughout the project I had so many emotions. I wanted to plan a fundraiser for Mark, our friends, his family, classmates, future culinarians, etc…. But I had a lot of emotions tied to this. I am an event planner; I plan a lot more complex events than a pizza party and my stress level with them are no where near close to the stress this caused me. I just wanted to come up with fun pizza ideas, maybe make some crafts and recognize Mark. The reality was, I was an emotional head case. I physically was in over my head because I couldn’t lift or do anything. The times I tried to lift something I hurt myself. I almost lost my finger one day. I tried lifting a tred and got my finger stuck in between two pieces; with a little bit of blood, Larry saved the day and my finger. But emotionally I was having a hard time with wrapping my head around my best friend being gone for 10 years. Every time I needed help I was so frustrated by the fact that he wasn’t there to help me. I had to rely on people volunteering and actually showing up to help during the time frames that we had.
The little things like running out of materials or there being a hurricane on the original event weekend would make me laugh and sometimes cry; knowing that he was driving me crazy, just as he did when he was alive.
13th step- red brick oven overlay
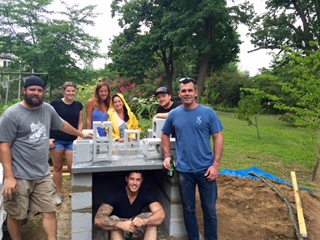
We now only had a week to pull this together. I was now deep into my busiest season with my event planning company and my full-time corporate job. Also, I don’t live at the construction site. As much as it seemed like I did from September through November, I really live in Jersey City and work in NYC + travel for work. One week. How were we going to do it? I was terrible to be around this week. Not that I was that enjoyable from September through November but this week specifically I was insane. Needless to say we pulled it off/ finished it the Tuesday night prior to the event with spot lights set up and building until 12 a.m. Thank you, Rob Stenger, for your dedication throughout the project but especially this day and night. You made it all happen. This could not have come to life without you.
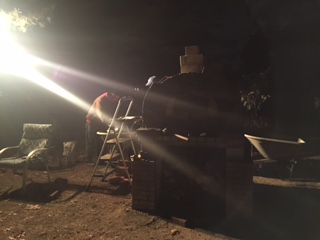
14th step- the most wonderful step of all, burning the oven form! What a glorious, yet scary step. I had nightmares that at this step the oven would collapse. It didn’t it just burned for hours while we sat in glory/front of it.
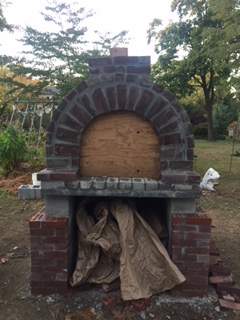
15th step- curing the oven aka making fires. This really should happen several times before you cook in it but I had a day to make a fire, the day before the event.

Part ii. the fundraiser
Finally after 2+ months of building and losing my mind the fundraiser was here. Thanks to help and encouragement from so many wonderful people. I couldn’t have done anything without all of you.
It was a wonderful fall day. We had the support of the Culinary Education Center that Mark and I had attended. We had their students to assist, the Principal and dining room teacher to delegate. Classmates that Mark had made and impression on.
We had donated food from Ultra Thin Pizza Shells.
We had an amazing photographer who donated her time and services, Dana Brown.
We had awesome entertainment by our friends, Matt & Devin.
We had the perfect guests.
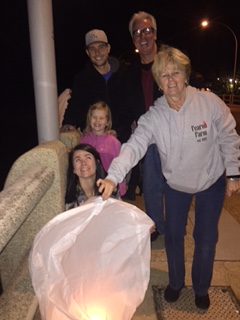
Unfortunately, I don’t have many photos of my favorite part of the day but this was when we walked over the bridge and let off or tried to let off lanterns.
Most importantly we acknowledged Mark and we raised scholarship dollars for culinary students who want to further their education, career and life. It means a lot to me to give back in general but especially to where I came from, my high school vocational program and to pay it forward in Mark’s honor. I received Mark’s culinary scholarship so I could continue my higher education. I know how much it means for students to receive this type of money and support. With the help of wonderful friends and family the scholarship fund has grown. Myself and the Culinary Education Center are in the midst of creating an application process for potential recipients to apply to the Mark C. Fearon Culinary Scholarship Fund.
Please spread the word so we can continue to grow this fund and improve the culinary world one student and scholarship at a time.
Please click here to donate to the Mark C. Fearon Culinary Scholarship Fund


